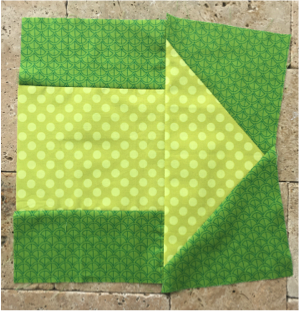
The January Block of the Month will be turned in at the February meeting. Submit the winning block and you’ll have the makings of a quilt that celebrates St. Patrick’s Day and reminds you to Spring Ahead and turn your clocks forward to Daylight Savings. That’s because the block this month is an oversized arrow in greens.
Use any greens you please just make them contrast with each other and make’em modern! As
always, use a 1/4” seam and press as you go. The block finishes at 12 1/2” by 12 1/2”.
The easiest way to make this block is to follow the tutorial here http://www.okcmqg.com/2013/10/october-block-of-month.html Use it! It’s much easier than what I’ve written.
To create the block, you’ll need two contrasting greens.
See dimensions below
Cut the background fabric into:
Two rectangles 4” x 8”
Two squares 7” x 7”
Cut the arrow fabric into:
One rectangle 7” x 8”
One rectangle 6” x 13”
Sew the two background 4” x 8” pieces to either side of the 7” x 8” arrow rectangle.
To make the oversized flying geese block that will form the point of the arrow, place the 6” x 13” arrow piece long side up and down, face up. Put a square 7” x 7” piece on the corner of the fabric, lining up the top right corner and right side. Yes, there will be extra fabric on the left side. Draw a pencil line from the left arrow corner lying under your square, to the lower right corner of the square. Sew on the traced line, trim a 1/4” seam and press to the dark side.
Now, do that again for the other side of the arrow point.
Trim the arrow piece on the long side (away from the arrow point) about a 1/4” to get a straight edge.
Find the center of that piece - fold it in half and mark it with a pin. Do the same for the rectangle you made in the first step. Now match the centers and sew the two pieces together. If it looks wonky, that’s okay, it’s supposed to. You’re going to fix that now.
Use a 12 1/2” by 12 1/2” ruler and square up the block. Be sure to leave a quarter inch seam at the point of the arrow - don’t trim your point off! If you don’t have a ruler, use the lines on your cutting board and you’re good to go.
You're Finished with your 1st Block!


